Below, you'll find information on the configuration process for using LG webOS displays.
If you haven't yet added players to the Players section of your network, reference the Adding Players to Your Network article.
Note: It's strongly recommended that you change the Admin Password on your display to ensure device security.
In this article:
- Supported LG webOS Displays
- Setup Steps LG webOS VERSIONS 3.2 (3.0+) – 6.0
- Setup Steps for Hospitality webOS Application (HCAP)
- Using an HDMI Input in Portrait (webOS 4.0+)
- Setup Steps for all previous LG webOS VERSIONS
Supported LG webOS Displays
webOS 2.0
- SM3B (22″)
- UM3C (75″/86″)
- UH5C (75″/86″)
- LS95D (98″)
- VH7B (55″)
- VM5B (55″)
- VM5C (49″)
- BH5C (86″ Stretch)
- BH7E (88″ Stretch)
webOS 3.0
-
- UH5C (49″/55″/65″)
- EH5C (55″)
- EF5C (55″)
- EF5E (55″)
- EV5C (65″)
- XF3E (55″)
- XS2E (49″/55″)
- XE3C (55″/75″)
- XEB3E (43″)
webOS 3.0+
- SM5KD (32″/43″/49″/55″/ 65″)
- VX1D (55″)
- SVH7E (55″)
- VM5E (49″/55″)
- VH7E (55″)
- TR3E (86″) – Touch
- TC3D (55″/65″/75″) – Touch
- TA3E (43″ and 55″)
- WP320 (external box – FHD)
- EV5E (65″)
- EG5SD (55″)
- EG5CD (55″)
- EG5CE (55″)
- EJ5D (55″)
- EJ5E (55″ amd 65″)
webOS 4.0
- SM5KE (32″/43″/49″/55″/65″)
- UH5E (49″/55″/65″/75″/86″/98″)
- WP400 (exterbal box – UHD)
- BH5E (86″ Stretch)
- BH7E (88″ Stretch)
webOS 4.1
- 22SM3G
-
UH5F (43″/49″/55″/65”)
-
UH7F (43″/49″/55″/65″)
-
UL3G (43″/50″/55″/65″/75″/86″)
- ULG-B (43″/50″/55″/65″/75″/86″)
-
UM3DF (43″/49″/55″/65″)
-
UM3DG (43″/49″/55″/65″)
-
UM3F (43″/49″/55″/65″)
webOS 6.0
- UL3J
- UH5N
- UM5N
- UH5J
- UH7J
- SM5J
You will need the LG remote as you follow the setup steps below:
Setting Up LGwebOS Versions 3.2 (3.0+) – 6.0
- From the “Ready to Use” startup screen, select ‘Quick Start’ then ‘Start’
- Set the Rotation if display will be in Portrait mode.
- Set the Date and Time
- Set Auto Power Off to ‘Off’
- Select ‘Done’
- Press the ‘Settings’ button on the remote and select the General menu, then select ‘Network’
- If hardwired, ensure that the screen is connected to the network or select a wireless network.
- Back at the Settings menu, select EZ Settings. Select ‘URL Play Via‘. Ensure that ‘URL Loader’ is turned OFF.
- Back at the the Settings menu, select EZ Settings and select ‘SI Server Settings’
- Fully Qualified Domain Name should be turned ‘On’
- Enter the URL: https://go.engagephd.com/lg.ipk (If https fails, try http)
- Application Launch Mode should be set to ‘Local’
- Under ‘Application Type‘ select IPK.
- Local Application Upgrade should be set to ‘Remote’
- Once you select ‘Remote’ you will see a popup window at the bottom of the screen that will indicate “Application Upgrade from Remote”
- A “Complete” message will appear once the display has successfully connected to the software. Select ‘OK’
- Turn the display Off and then back On using the power buttons.
- Once the display turns back on hit the Stop button on the remote 4 times.
- When the display powers back on, a blue EngagePHD Channel ID screen should appear. Enter the EngagePHD Channel ID (Example: 721-10069) The ‘Play’ button on the remote will allow you add the dash (see Play button location on the remote diagram above).
- Press the ‘OK’ button.
- The screen will remain grey until content has finished downloading to the screen. This may take a few minutes depending on connection speeds.
To access the Channel ID screen again to view or modify the Channel ID, press the ‘Stop’ button on the remote 4 times (see Stop button location on the remote diagram above)
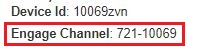
Note: The Engage Channel ID can be found from the Players page in the software if not provided to you by your representative:
LG Hospitality webOS Application (HCAP)
We’ve added application support for LG’s Hospitality range of webOS displays. This is a different application to LG’s Commercial Digital Signage line up and display configuration is notably different. Functionality and content support are very much the same, however there is no on board storage within the Hospitality displays so a solid Internet connection is essential.
You will need to use the LG Hospitality IR Remote to complete these setup steps:
1) When you switch the screen on for the first time, you will see a setup message that states “Welcome to the first use wizard“. Arrow up to the ‘X‘ and close.
2) Press the ‘Menu‘ button. You will see a list of options on the right hand side of the screen. Select the option at the bottom (3 vertical dots).
3) Navigate to “Picture“, arrow right and select “Picture Mode/APS“. You should then see options for Backlight, Contrast, Brightness and Sharpness. Do not go into any options, just make sure you see these options.
4) Press the ‘Menu‘ button repetitively and quickly. On the right hand side of the screen you will see the colored menu dots appear/disappear. Keep pressing the ‘Menu‘ button until the screen locks up. Then enter 9876 and then OK.
This screen will appear:
7) Enter in 119 and then the ‘Menu‘ button:
8) Then enter in 253 and then the ‘Menu‘ button:
9) You should now be in the Pro:Centric menu. Go to Network > Network Settings and configure as required to put this screen on to your network:
10) Next go to the “Pro:Centric” and set:
- Mode = HTML
- Update Event = Disable
- Media Type= IP
- Server Address = Domain Name
- Domain Name = go.engagephd.com
- Port Number = 80
11) Turn the screen off, then on again.
12) When the Channel ID page appears, enter in your Channel ID for the Player record you are attaching to this screen.
13) Wait for the content to load which may be incorrectly scaled, then restart the screen again.
- HCAP does not support On/Off scheduling via the EngagePHD web application.
- HCAP does not have any ‘onboard’ storage. The content is cached, but if the screen is turned off/on again then the screen will have to pull the content from our web-servers again. If required, we can provide an edge server to sit on the LAN which will download all of the content from our web-servers and distribute over the LAN to all the HCAP screens. This might be more efficient if there are lots of HCAP screens running the same content in particular.
- HCAP doesn’t allow us to remotely update the screen’s firmware from our web application.
- HCAP doesn’t allow us to take screenshots.
Using an HDMI Input in Portrait (webOS 4.0+)
1) From the ‘Players‘ section of the software, click on the player description to open the player properties.
2) Set the ‘Orientation‘ to Landscape.
3) Using the remote at the screen, the screen rotation must be set to 90. Settings > Display > Rotation > Screen Rotation.
Setting Up Previous LGwebOS Versions
Once you have unpacked and mounted the display, connect it to the network via an Ethernet Cable (DHCP is supported, but if you require a fixed IP address, you will need to define the IP information on the display). When you are ready switch the screen on and follow the instructions detailed below using the remote control that is supplied with the screen:
1) Press and hold settings button until a box appears upper right (hold for 5-10 seconds).
2) Type ‘8080’ with the remote control and then press ‘OK’. This will launch a different menu. Ensure that:
- Application launch mode is set to ‘Local’.
- Ensure Fully Qualified Domain Name is set as “ON“
- Enter the URL: https://go.pinghd.com/lg.ipk
- Under ‘Application Type‘ select IPK.
- Finally select ‘Remote’ Application Upgrade and ‘Confirm‘.
3) Turn the display off after it says “application updated‟ and then turn it back on again.
4) Once the display turns back on hit the Stop button on the remote 4 times.
5) You will be prompted to enter the Engage Channel ID. When entering the Engage Channel ID, you may need to use the Play button to enter the dash (some LG remotes will have a dash button):
Note: The Engage Channel ID can be found from the Players page in the software if not provided to you by your representative:
Note: If you ever need to Engage Channel ID to a new ID, press the ‘Stop’ button on the remote 4 times (see remote diagram above).
Changing the LG webOS Admin PIN/Password
If you know the IP address of a webOS screen and type that IP address into your web browser, you will get to a webOS login page: